-
Cursor에서 Figma MCP 사용Tool/VSCode&Cursor 2025. 3. 6. 12:08

1. Figma API key 생성하기
1.1. Figma 로그인
먼저, Figma 웹사이트(https://www.figma.com)에 로그인
1.2. Profile 접근
페이지 오른쪽 상단에 있는 프로필 아이콘(아바타)을 클릭. 이 아이콘은 보통 사용자의 이니셜이나 설정한 프로필 사진으로 되어 있다.
1.3. Settings 메뉴드롭다운 메뉴에서 'Settings' 또는 '설정'을 선택

1.4. API Key 생성
- 'Settings' 페이지로 이동하면 탭 메뉴에서 'Security' 섹션을 찾을 수 있다.
- 이 섹션에서 'Generate new token' 버튼을 클릭
- 생성할 토큰의 용도를 설명하는 이름을 입력하고 'Create' 버튼을 클릭하여 API 토큰을 생성

Security figma-mcp-access-token을 생성한다.

Generate new token
1.5. API Key 사용생성된 토큰은 API를 통해 Figma 데이터에 액세스 할 때 사용된다. 이 키는 안전하게 보관해야 하며, 누구와도 공유하지 않는 것이 중요
개인 엑세스 토큰을 사용하면 단일 사용자처럼 Figma API에 엑세스할 수 있다. (30일 이후 만료)

생성된 figma-mcp-access-token 복사 2. Figma MCP 서버 설정
https://github.com/GLips/Figma-Context-MCP?tab=readme-ov-file
2.1. 저장소 복제
$ git clone git@github.com:GLips/Figma-Context-MCP.git2.2. 종속성 설치
$ pnpm install아래 발생 시 pnpm 설치
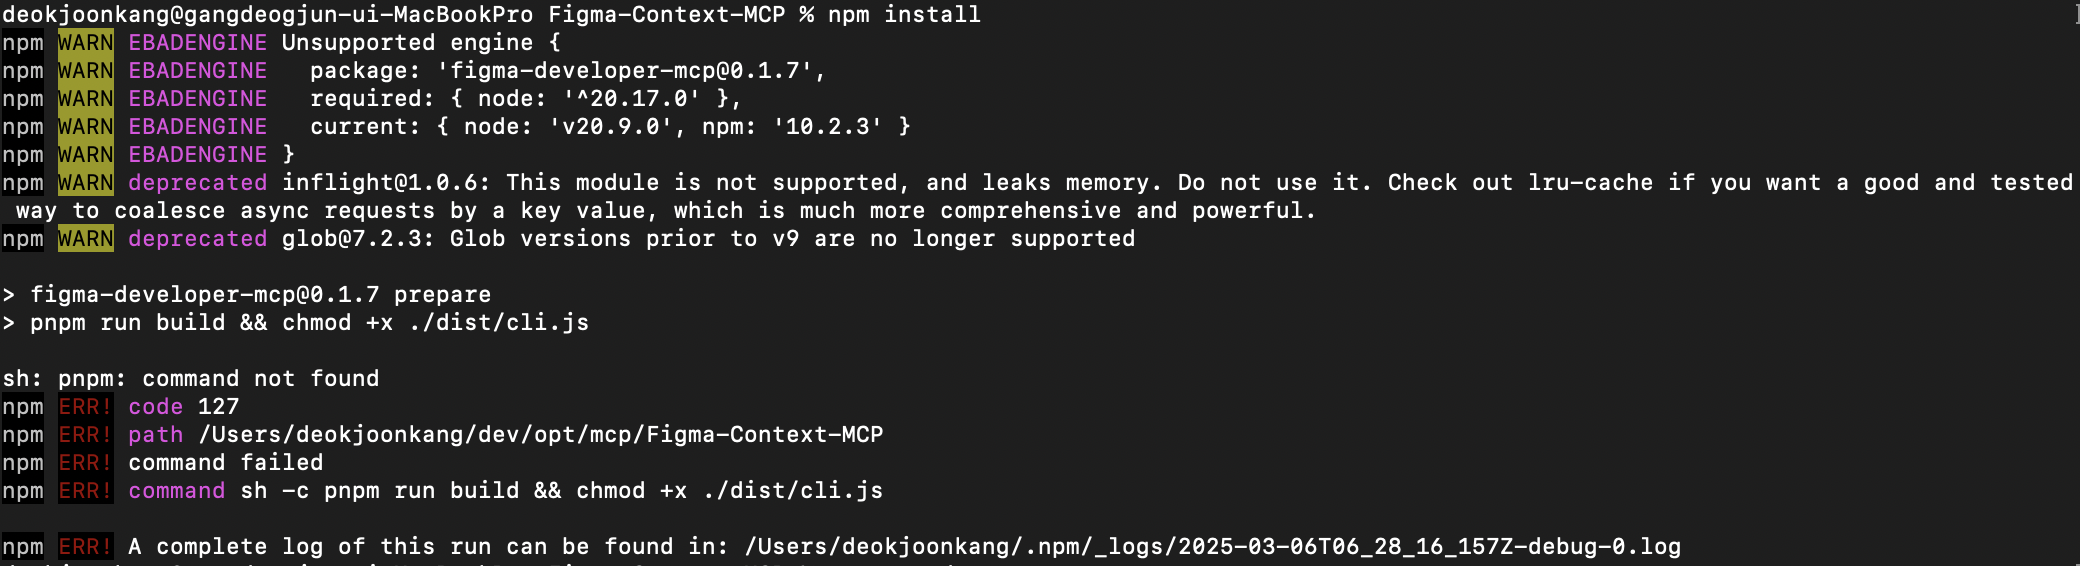
sh: pnpm: command not found
npm ERR! code 127
npm ERR! path /Users/deokjoonkang/dev/opt/mcp/Figma-Context-MCP
npm ERR! command failed
npm ERR! command sh -c pnpm run build && chmod +x ./dist/cli.js

npm ERR! A complete log of this run can be found in: /Users/deokjoonkang/.npm/_logs/2025-03-06T06_28_16_157Z-debug-0.log
pnpm은 npm과 유사하게 Node.js 패키지를 관리하는 도구이고 더 효율적인 디스크 사용과 빠른 설치 속도를 제공한다.
pnpm이 설치되어 있지 않아서 나는 에러이고 아래 전역으로 설치하자.
$ npm install -g pnpm2.3. Figma API access token 복사 및 .env.example 복사해서 .env 생성 후 토큰 업데이트
# Your Figma API access token
# Get it from your Figma account settings: https://www.figma.com/developers/api#access-tokens
FIGMA_API_KEY=your_figma_api_key_here

# Server configuration
PORT=3333
2.4. 서버 실행
$ pnpm install2.5. 서버시작
$ npx figma-developer-mcp --figma-api-key=<your-figma-api-key>
3. Cursor 설정
3.1. MCP 서버 추가

4. Cursor에서 실행
4.1. Agent 실행
4.2. 로그

결론
결과물은 원하는대로 나오지 않았지만 이런식으로 사용할 수 있다는걸 안것만으로도 상당한 성과인것 같다.
시간이 될때 MCP 서버도 직접 만들어봐야지!
'Tool > VSCode&Cursor' 카테고리의 다른 글
Cursor에서 Agent와 Ask의 차이점 (0) 2025.03.06 Cursor에서 MCP 사용 (1) 2025.03.06 Cursor에서 Project Rules 사용 (1) 2025.03.05 Cursor에서 Rules for AI 사용 (0) 2025.02.28 Cursor + SpringBoot 개발설정4 + JWT (1) 2024.12.13